It’s the middle of nowhere. The sun’s fading, the wind’s howling, and your rooftop tent pole just bent—or worse, snapped clean in two. Maybe it’s from a sudden gust, or maybe the metal’s fatigued. Either way, a collapsed tent isn’t an option. But don’t despair—you don’t need a gear shop or fancy tools to save your setup. Let’s dive into field-ready, smart fixes to keep your rooftop tent standing tall, using only what you’ve got at hand.
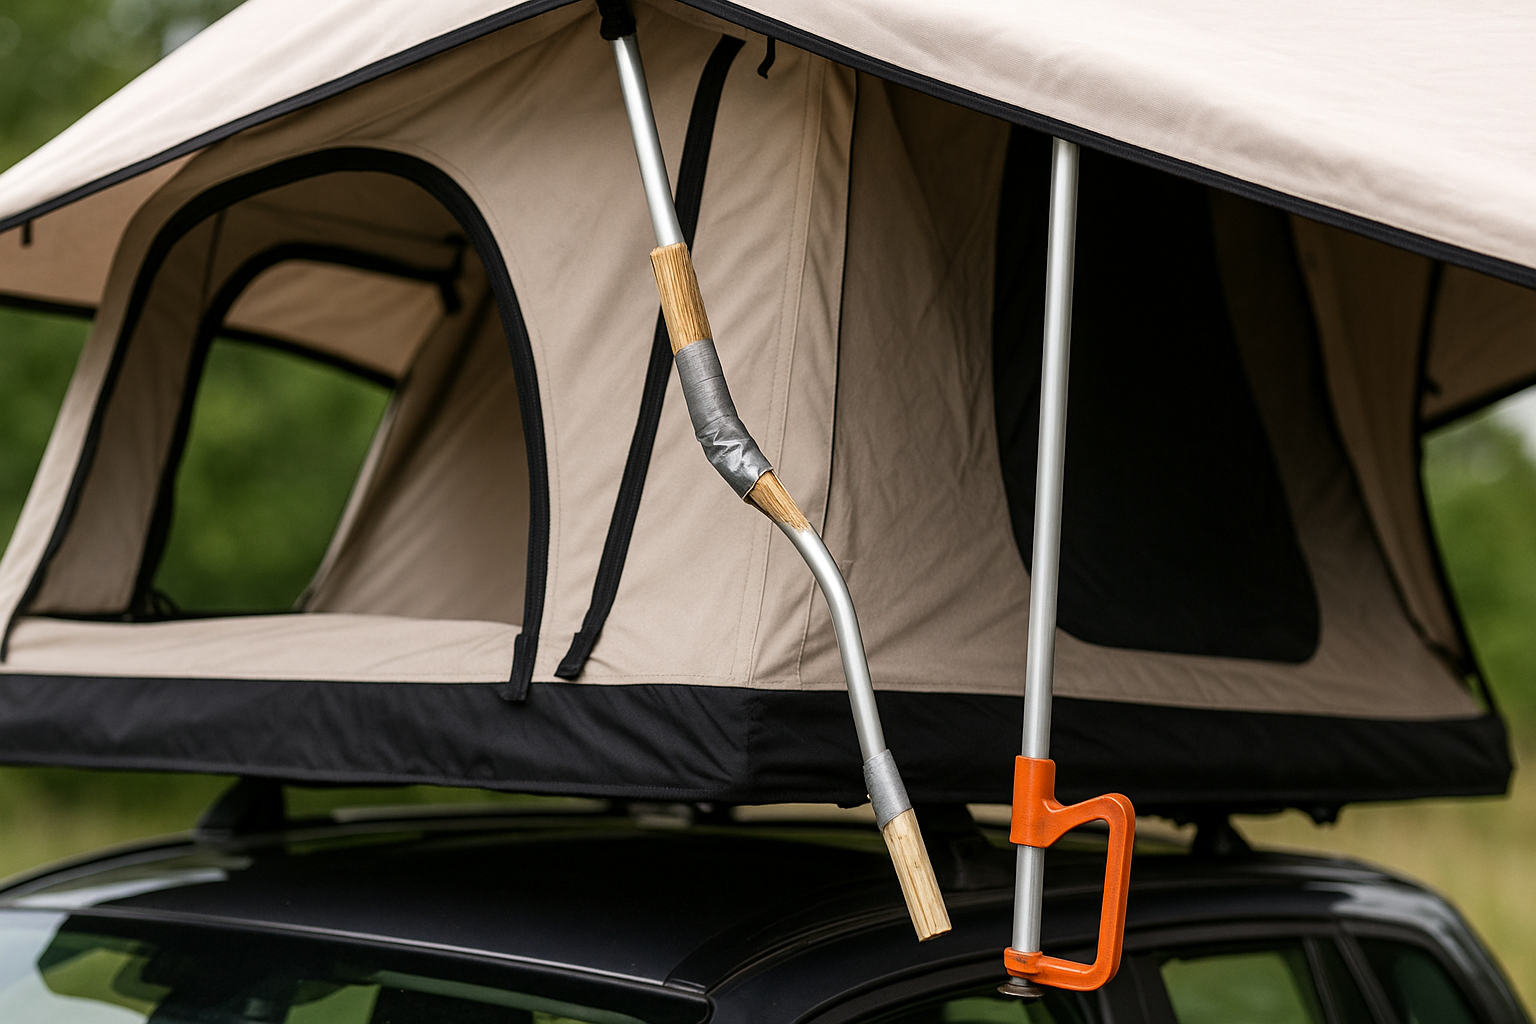
1️⃣ Splint the Snap: Reinforce with What’s Around
A snapped pole can be stabilized with a field splint:
- Look for a sturdy stick, trekking pole, or even a metal tent stake that’s longer than the break.
- Align it alongside the broken section, making sure it overlaps both sides by several inches.
- Secure it tightly with paracord, duct tape, or even strips of fabric—the tighter the better.
- If possible, wrap in figure-8 patterns to distribute the force and prevent slipping.
🛠 Why it works: This makeshift splint redistributes pressure across the break, allowing the pole to regain stability.
2️⃣ Bent But Not Broken? Straighten with Controlled Force
If your pole is just bent, not snapped:
- Use a flat, solid surface (like a rock, log, or vehicle bumper) to gently press the pole back into alignment.
- Apply gradual, even pressure along the bend—avoid sudden jerks that could snap it.
- If the pole is too stiff, heat it gently with body warmth or sunlight to make it more pliable.
🛠 Why it works: Controlled force spreads tension evenly, helping to realign the pole without creating stress fractures.
3️⃣ Create a Temporary Sleeve: Stronger Than a Splint
For a snapped pole that needs more structural integrity:
- Find a sturdy hollow object like a section of metal pipe, PVC, or even a cut-down tent stake sleeve.
- Slide it over the break, ensuring it extends at least 3 inches past both ends.
- Wrap it tightly with tape or cord, compressing the pole pieces against the sleeve.
🛠 Why it works: A sleeve acts like a cast, bracing the pole from the outside for stronger support.
4️⃣ Field-Built Pole Replacement: Improvise New Supports
If a pole is beyond repair:
- Look for deadwood branches, ski poles, or adjustable trekking poles as replacements.
- Cut to length using a multi-tool or knife.
- Wedge or lash the replacement securely into the tent’s pole sleeve or mount point.
- For extra stability, brace with duct tape, cordage, or even zip ties if available.
🛠 Why it works: Improvised poles keep your shelter functional, even if you have to replace a key support.
5️⃣ Tension Tricks: Redistribute Stress
If a pole is compromised but functional:
- Use guy lines or extra paracord to redistribute tension from the damaged pole.
- Stake out corners or guy points wider, reducing pressure on the weakened section.
- If the tent allows, shift weight or sleeping positions to reduce strain on the compromised pole.
🛠 Why it works: Reducing pole load buys you time until a full repair or replacement.
6️⃣ Tape and Lash Hack: Emergency Reinforcement
No splint, no sleeve? Go full wrap-and-lash:
- Wind duct tape, electrical tape, or even strips of cloth tightly around the break or bend.
- Wrap in multiple layers, alternating direction, to create compression and stability.
- Add a cord lash over the tape for added strength.
🛠 Why it works: This quick fix compresses the break point and minimizes further damage, acting as a temporary brace.
7️⃣ Height Adjustment Hack: Shorten the Tent Profile
If a pole can’t be fully repaired to original height:
- Adjust tent tension and guy lines to compensate for the shorter pole.
- Lower the overall tent height, creating a lower-profile but functional shelter.
- Secure with extra cordage or straps to maintain tension.
🛠 Why it works: A shorter but stable setup is better than none—and it can handle wind better.
8️⃣ Wedge Support: Ground-Up Stability
For ground-contact poles (e.g., ladder supports or corner poles):
- Wedge rocks, logs, or stacked debris underneath the pole base to stabilize it.
- Level the support by adding small stones or sand around the wedge.
- Secure with cord or tape if the pole tends to slip.
🛠 Why it works: Stabilizing from the base prevents pole wobble and collapse.
9️⃣ Prevention Mindset: Reinforce Before Failure
If you’ve noticed a pole’s flexing or weakness:
- Wrap potential weak points with tape or cordage before they fail.
- Reinforce key stress areas at joints or bends to distribute pressure.
- Store poles in protective sleeves during transport to reduce damage.
🛠 Why it works: Proactive reinforcement extends the life of poles and reduces mid-trip failures.
Real-World Camper Tips:
🔹 “I splinted a snapped pole with a trekking pole and duct tape—it lasted the whole trip!”
🔹 “A tent stake and some guyline tension gave me enough stability to sleep through a storm.”
🔹 “I always carry a mini roll of Gorilla Tape—it’s saved my gear more times than I can count.”
Conclusion:
When rooftop tent poles fail in the field, you can’t wait for a replacement. But with ingenuity and the right mindset, you can create strong, smart fixes that’ll keep your shelter standing—using only what’s on hand. Whether it’s a splint, a sleeve, or a full-on field replacement, these tactics will keep you covered through the night and beyond.
🌲 Adapt, improvise, and keep your rooftop shelter standing—no matter what the wilderness throws your way.