The sharp snap of bone. The dull, throbbing ache in your ankle. Every step sends pain shooting up your leg. You’re stranded deep in the wilderness, your food scattered, your water bottle just out of reach, tangled in the underbrush. You can’t climb. You can’t crawl far.
This is no minor inconvenience—it’s a life-threatening scenario. When you’re injured, low on supplies, and immobilized, the difference between survival and disaster is often ingenuity. You need to create a reachable food and water station—fast.
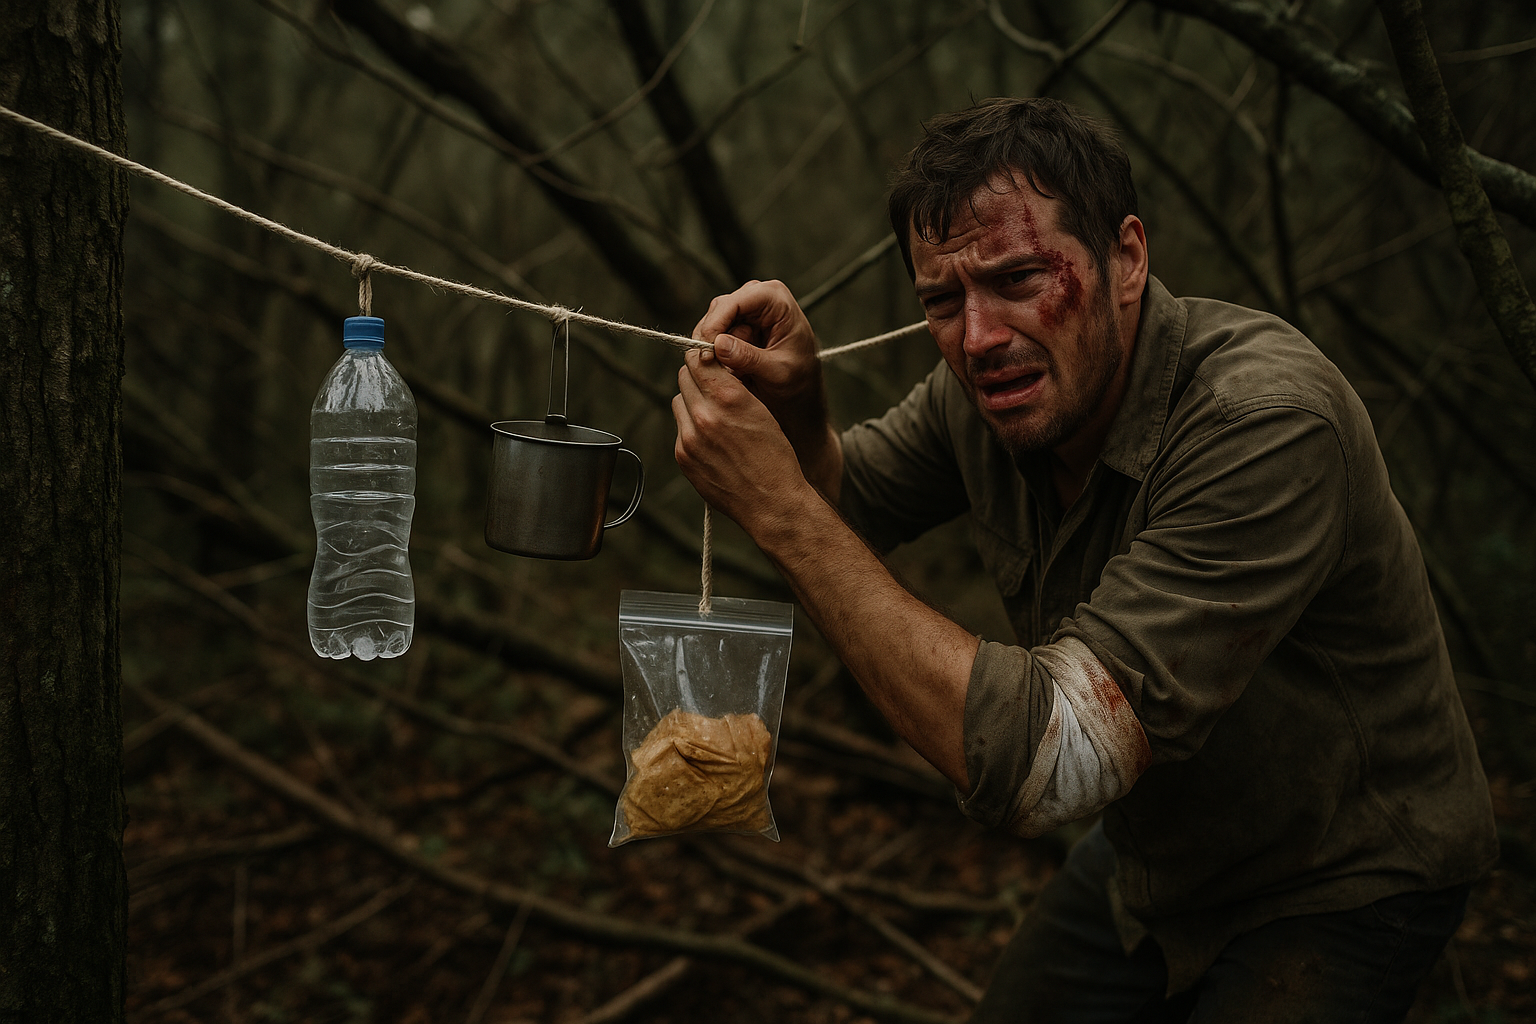
Here’s how to use a clothesline threaded through nearby tree limbs to rig an emergency resource station that keeps critical supplies within arm’s reach, even when mobility is gone.
🏕️ Why This Matters in Survival Situations
✅ Injuries reduce your range of motion—reaching up or bending down could make injuries worse.
✅ Low supplies demand careful rationing—you can’t risk dropping or losing essential items.
✅ Wildlife threats increase when supplies are scattered and unprotected.
✅ Organizing essentials within reach conserves energy, reduces risk, and maximizes survival chances.
🪢 Step 1: Choose a Central Location
When immobilized:
- Find a comfortable, sheltered spot—under a tree or near a natural barrier for wind protection.
- Clear debris and rocks to create a safe, flat space to sit or lie down.
- This is now your survival hub.
🪢 Step 2: Identify Nearby Trees and Low Branches
- Look for limbs within reach when seated or lying down.
- Choose multiple limbs if possible to distribute the weight of food and water evenly.
- Avoid dead branches that might snap under load.
🪢 Step 3: Thread the Clothesline to Create a Resource Web
- Tie one end of the clothesline to a nearby tree limb—secure it with a simple knot.
- Thread the line through additional nearby limbs, creating a web or network of lines.
- The goal: create a series of horizontal lines at reachable height (waist or shoulder level).
If you’re completely immobile:
- Use a stick or trekking pole to hook and pull the line through branches without needing to stand.
- Tie one end of the line to a rock or weighted object you can throw or swing over a branch.
🪢 Step 4: Secure Food and Water to the Line
- Use carabiners, gear loops, or simple knots to hang essential supplies:
- Water bottle (tie it securely to prevent spills).
- Food bags or pouches, preferably sealed in odor-proof or dry bags.
- Emergency gear like a whistle, mirror, or flashlight for signaling.
- Position items within easy reach to minimize movement and strain.
🪢 Step 5: Add Redundancy and Protection
- Double-wrap critical items to prevent them from falling or swinging in the wind.
- If possible, hang items inside a tarp or poncho to shield them from rain.
- Use bright-colored gear or reflective strips to locate supplies easily, even in low light.
🪢 Step 6: Improvise with What You Have
- No clothesline? Use shoelaces, tent guy lines, or backpack straps to extend your reach.
- No trees nearby? Drive sturdy sticks into the ground around you and run the line between them.
- Low supplies? Gather whatever’s left—empty bottles, wrappers, food crumbs—and consolidate them into a reachable spot to avoid attracting animals.
🏕️ Field-Tested Scenario: Injured in the Rockies
A solo hiker slipped on a moss-covered boulder in the Rockies, fracturing his ankle. Crawling back to camp was excruciating, and his gear was scattered. Using his clothesline, he threaded a web through low branches, securing his food, water, and signaling gear at arm’s length. Over 36 hours, he rationed supplies and used his flashlight to signal rescuers who eventually spotted his reflective gear. His resource web kept him alive.
📊 Why This Method Beats Scattered Gear
| Method | Pros | Cons |
|---|---|---|
| Clothesline Resource Web | Keeps essentials secure and within reach | Requires setup, some cordage needed |
| Scattered Gear | Quick to drop, no setup | Increases risk of losing items, injury |
| Backpack at Base | Contains supplies in one spot | Hard to access if immobilized |
| Hanging Gear from Single Branch | Simplifies setup | Limited space, may swing or fall |
🔥 Emergency Add-Ons for Maximum Survival
- Hang a whistle or signal mirror from the clothesline for easy signaling.
- Use a reflective Mylar blanket draped over the web to catch attention and provide shade.
- Secure a rain catch system (like a plastic bag or tarp) tied to the line to collect water.
🎒 Essential Gear to Pack (Available on Amazon)
✅ Sea to Summit Lite Line Clothesline – Compact, strong, and versatile.
✅ Paracord 550 Reflective – Multipurpose and visible in low light.
✅ Carabiners or Gear Clips – Quick, secure attachments.
✅ Odor-proof Dry Bags – Protect food from animals and moisture.
✅ Emergency Mylar Blanket – Doubles as a reflector and rain shield.
🛠️ Pro Tips for Field Success
- Practice threading and tying knots at home—it saves crucial minutes in the field.
- Prioritize water access—tie your bottle at the most reachable point.
- Conserve energy by limiting trips between spots—centralize supplies.
- Use color coding or labeling for easy item identification.
🚨 Conclusion: Stay Fed, Hydrated, and Alive
When injuries limit your movement, and supplies are scarce, every decision matters. Threading a clothesline through nearby limbs transforms scattered gear into a reachable lifeline that keeps you nourished, hydrated, and visible to rescuers.
Don’t wait until disaster strikes. Practice this life-saving setup now. It could be the difference between rescue and tragedy.